- Q:
COMMON MISUSE SYSTEM FAILED AND WARNING
- 1.SWITCH OFF THE COMPUTER WHILE UPDATING THE SYSTEM:Consequence: It may lead to system file corruption or incomplete installation, triggering blue screen, system crash and other problems.Preventive advice: Make sure the power supply is stable when performing a system update, do not cut off the power or force the computer to shut down in the middle of the process. After completing the update, restart the computer as prompted to apply the changes.
2.IMPROPER HARDWARE OPERATION:Consequence: May result in hardware damage or data loss.Prevention advice: When replacing hard drives or other hardware, make sure the device is completely powered off and follow the instructions for proper operation. Pay attention to the position of the screws and slots to avoid excessive force leading to deformation or damage of the parts.
3.IMPROPER TEMPERATURE MANAGEMENT:Consequences: Long-term high-temperature operation may lead to equipment performance degradation, shorten the life of hardware, and even cause system failure.Prevention advice: Keep the computer well ventilated around the computer and avoid using it in a high-temperature environment for a long time. Clean the heat sink and fan regularly to ensure that the cooling system works properly.
4.POWER MANAGEMENT PROBLEMS:Consequences: Unstable power supply may lead to system instability or unexpected shutdown, damage to hardware or loss of data.Prevention Recommendations: Use a power adapter that meets the requirements of the device and ensure that the power outlet is stable and reliable. Avoid using the computer in environments with large voltage fluctuations.
5.SOFTWARE COMPATIBILITY PROBLEMS:Consequences: Installing incompatible software may lead to system conflicts, performance degradation, or even trigger a system crash.Prevention advice: Before installing new software, check whether it is compatible with the current operating system and hardware configuration. Give preference to official channels for downloading software and perform regular system updates to ensure optimal compatibility.
We are committed to providing you with excellent after-sales service. If you encounter product quality problems or other situations where you need help, please feel free to contact us and we will be happy to help you solve the problem.1. The product is still under warranty (specifically based on the proof of purchase).2.The damage of parts is not caused by human factor.3. The damage is confirmed by our technici
- Q:
2 WAYS TO UPDATE WINDOWS SYSTEM
- Update Windows System Online1.Check for updates:Press “Win + I” to open Windows Settings. Click on “Windows Update”.Click the “Check for updates” button. The system will automatically detect available updates.

2.Download and install the update:If an update is available, the system will display the update. Click the Download and Install button.Depending on the size of the update file, the download may take some time. Make sure your device is connected to a stable network.3.Reboot your computer:Once the update is complete, you will usually be prompted to restart your computer. Click “Restart Now” to complete the update.If the update requires more than one reboot, please follow the instructions.4.Complete the update:Once your computer restarts, the update will complete automatically. You can check the status of the update on the Windows Update page.
Update Windows System by USB.This method is suitable for users with unstable network connections or those who wish to update offline. You can download the update file from another computer and transfer it to the target device via USB drive to update.Steps:1.Download the Windows 11 Update Tool:On another computer with an Internet connection, visit the official Microsoft website.Scroll down the page to find the “Windows 11 Installation Assistant” and click the “Download Now” button.Once the download is complete, run the downloaded file (usually named Windows11UpgradeTool.exe).
2.Create a bootable USB drive:Insert a USB drive of at least 8GB.Run the downloaded installation tool and select “Create installation media (USB drive, DVD or ISO file) for another computer”.Click Next and select the language, version and architecture (usually the default settings are selected).On the “Which media to select” page, select “USB drive” and then select the USB drive to plug in.Click Next and the tool will automatically download the Windows 11 installation file and write it to the USB drive.3.Use the USB drive on the target computer to update:Insert the prepared USB drive into the computer that needs to be updated.Reboot the computer and enter the BIOS/UEFI setup by pressing the corresponding key (Del) during the boot process.In the BIOS/UEFI setup, set the boot order to prioritize booting from the USB drive.Save the settings and restart the computer, it will boot from the USB drive.Once you are at the Windows 11 installation screen, select “Upgrade this computer”.Follow the on-screen prompts to complete the update process.
4.Complete the update:Once the update is complete, the computer will automatically reboot and enter a new Windows 11 system.It is recommended that you run Windows Update after the update is complete to ensure that your system is up to date.
- Q:
BLUE SCREEN!!!
- Blue screen
Blue Screen errors (also called bug checks, STOP code errors, kernel errors, or BSOD errors) can occur if a serious problem causes Windows to shut down or restart unexpectedly to protect itself from data loss. You might see a message that says, "Windows has been shut down to prevent damage to your computer" or a similar message.
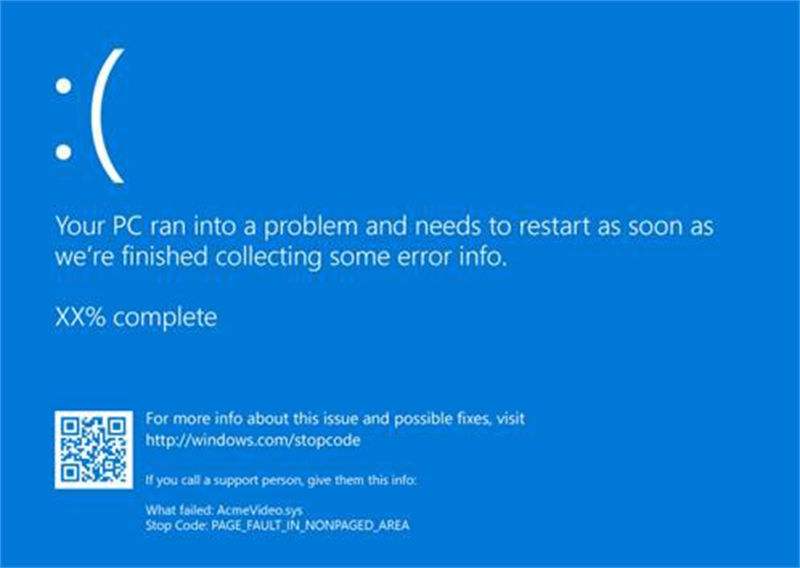
A hardware device, its driver, or software might have caused this error. To help determine the cause, the blue screen error might display a STOP code, such as PAGE_FAULT_IN_NONPAGED_AREA. When it‘s available, the module name of the code that was being executed is also listed after "What failed:".
Basic Troubleshooting Steps for Blue Screen Errors
1.Remove any new hardware. If you added new hardware to your PC before the error, shut down your PC, remove the hardware, and try restarting.
2.Start your PC in safe mode. If you‘re having trouble restarting, you can start your PC in safe mode. See Start your PC in safe mode in Windows for details. From safe mode, you can try the remaining troubleshooting steps.
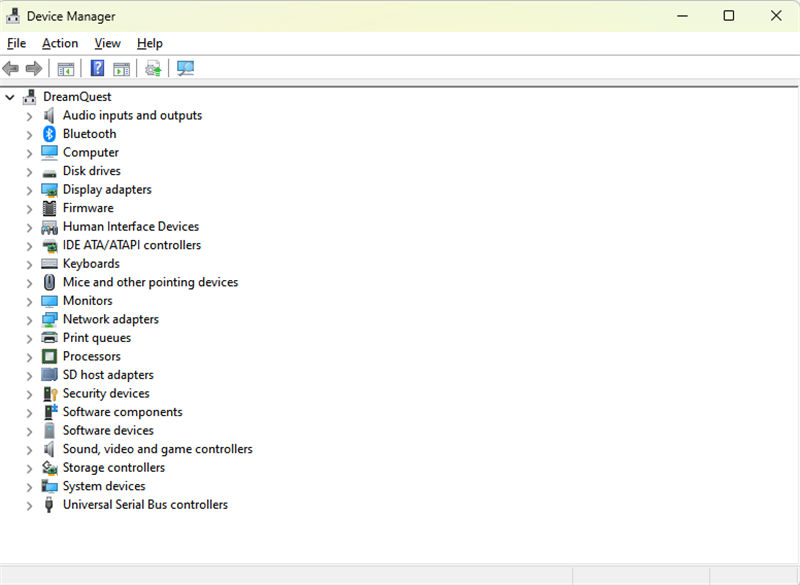
3.Check the Device Manager. Right-click the Start button and select Device Manager. Check to see if any devices are marked with the exclamation point (!). Right-click the device and select Update driver. If updating the driver doesn’t help, try disabling or uninstalling the device.
4.Check for sufficient free space on the hard drive. The operating system and some applications require sufficient free space to create swap files and perform other functions. Based on the system configuration, the exact requirement varies, but it‘s a good idea to have 10% to 15% of free space available.
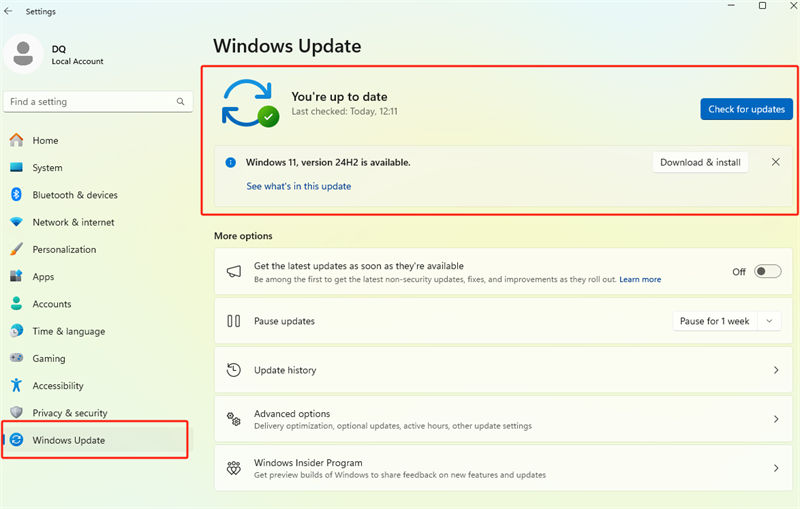
5.Install the latest Windows Updates. To check for updates,select Start > Settings > Windows Update , then select Check for updates.
6.Restore Windows. If none of these steps help, try restoring Windows using a system restore point, or one of the other options listed at Recovery options in Windows. Choose the recovery option that most closely matches your scenario.
Advanced Troubleshooting Steps for Blue Screen Errors
1.Check the Event Viewer. Check the system log in Event Viewer for other error messages that might help pinpoint the device or driver that‘s causing the error. For more information, see Open Event Viewer. Look for critical errors in the system log that occurred in the same time frame as the blue screen.
2.Run the Windows Memory Diagnostics tool. In the search box, type Memory, and then select Windows Memory Diagnostic. After running the diagnostic, use the Event Viewer to view the results under the system log. Look forthe MemoryDiagnostics-Results entry to view the results.
3.Memory dump analysis. IT professionals and developers can try performing a memory dump analysis. For details and other advanced troubleshooting steps, see Advanced troubleshooting for stop or blue screen errors.
If you have any other questions, please send them to our email
address, preferably with pictures, and we will get back to you as soon as possible.
- Q:
HOW CAN I RESET PASSWORD
- 1.Reboot your computer by pressing and holding the Shift key in the login screen while clicking the power icon** in the lower right corner > Restart.
2. Once you enter the recovery screen, select Troubleshooting > Reset this computer > Delete everything and follow the prompts (*Note: This will erase all data*).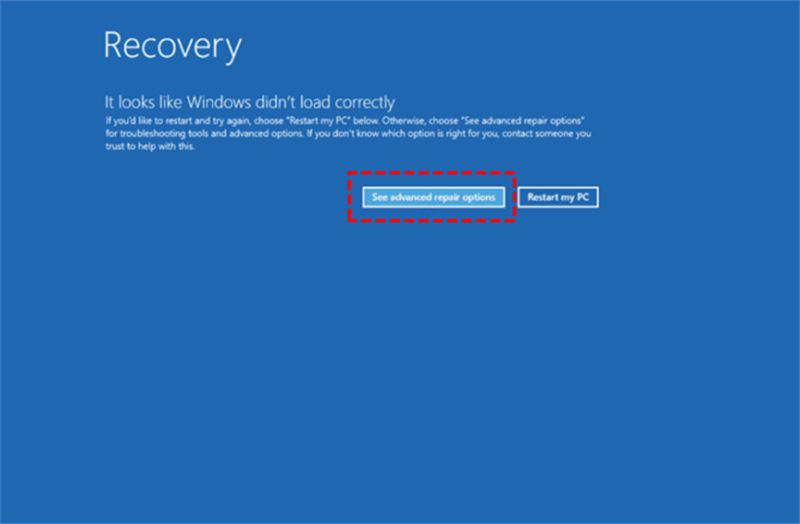
- Q:
HOW TO REINSTALL WINDOWS SYSTEM
- Reinstall the system (Windows 11 pro)
First go to Microsoft‘s official website to download the corresponding Windows 11(https://www.microsoft.com/en-us/software-download/windows11)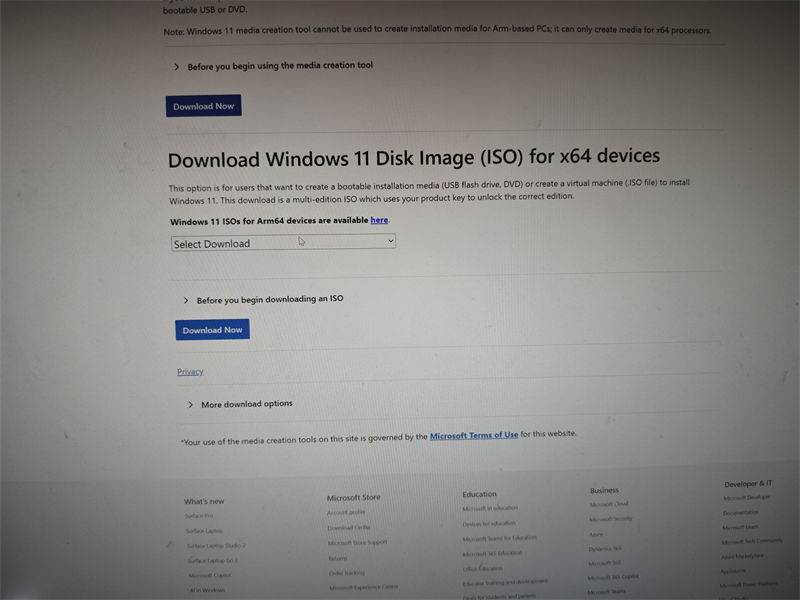
Then open the downloaded software and double-click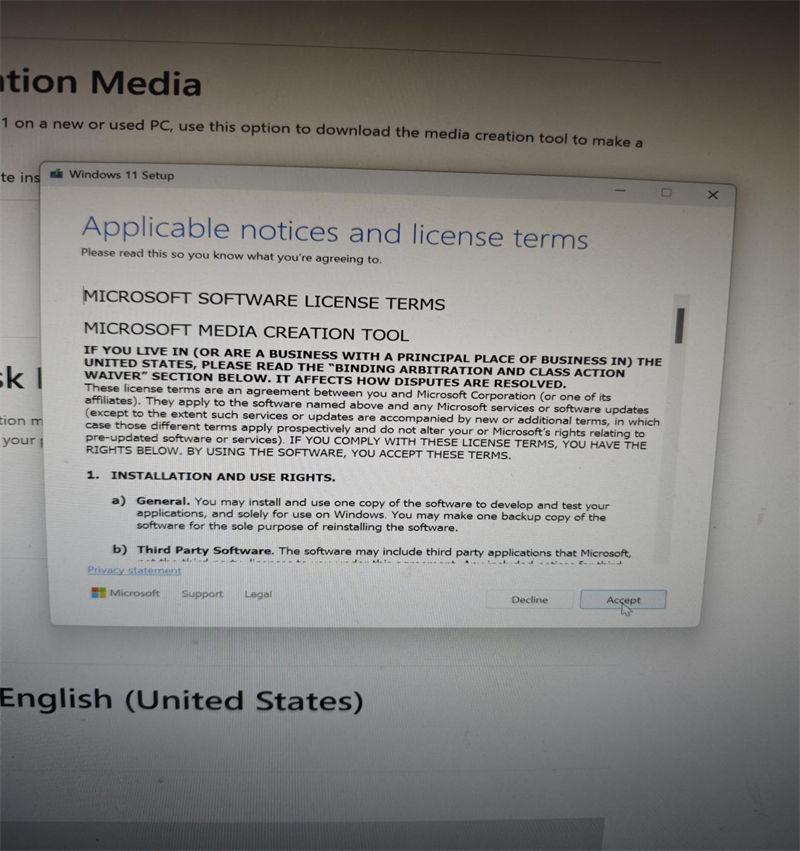
Select the language you want and click NEXT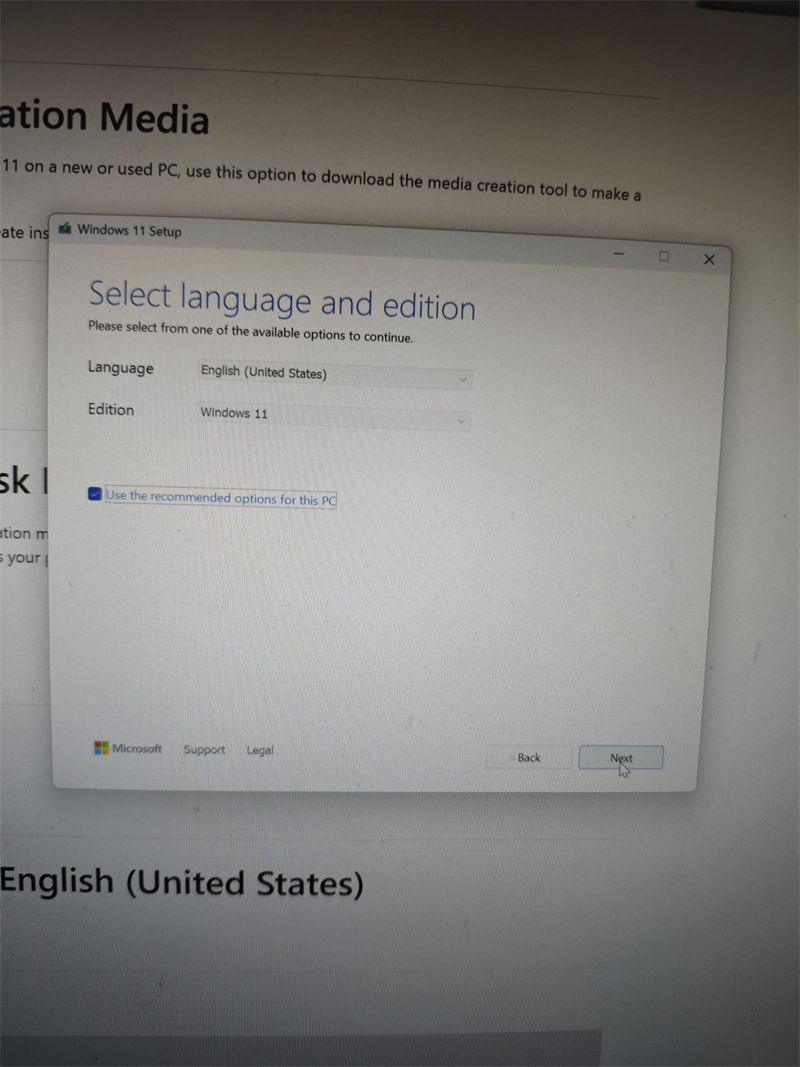
Then select USB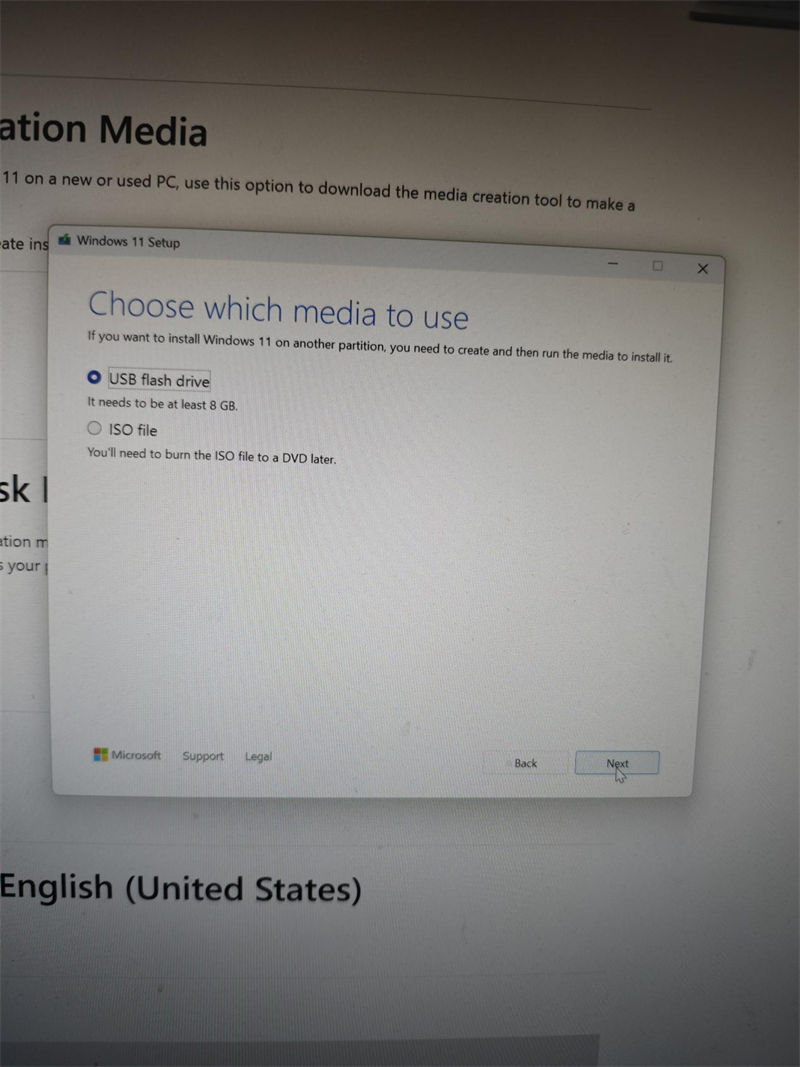
Select NEXT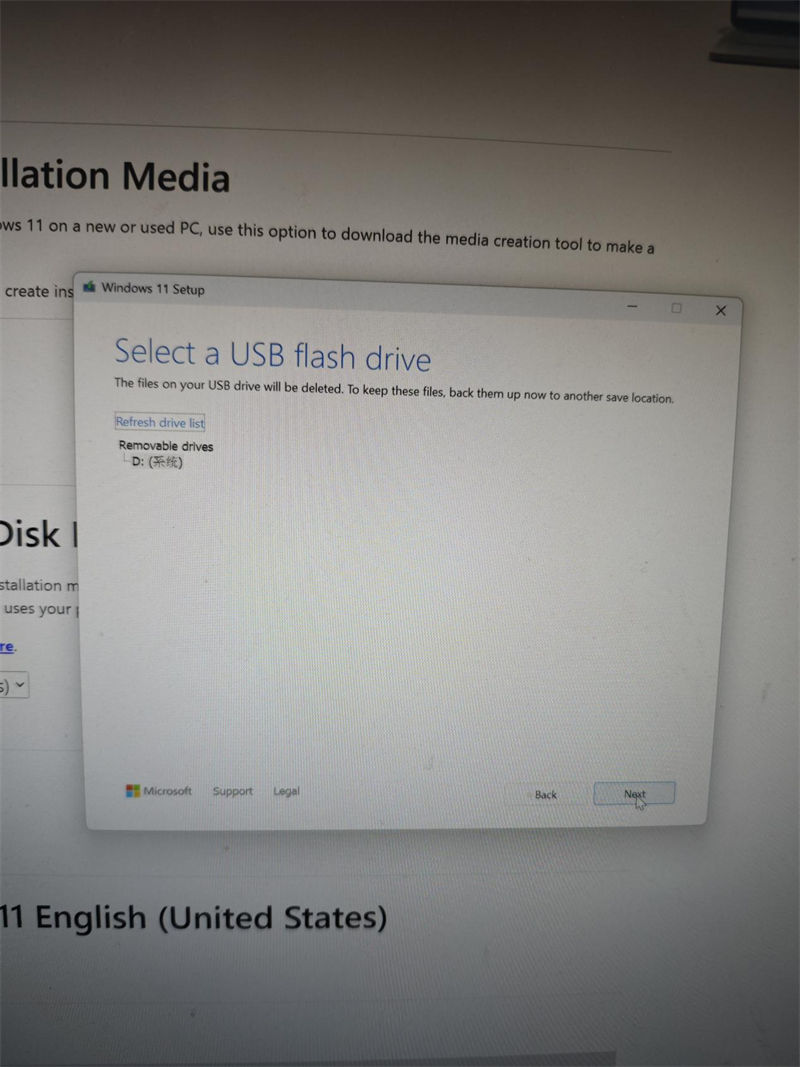
Waiting for loading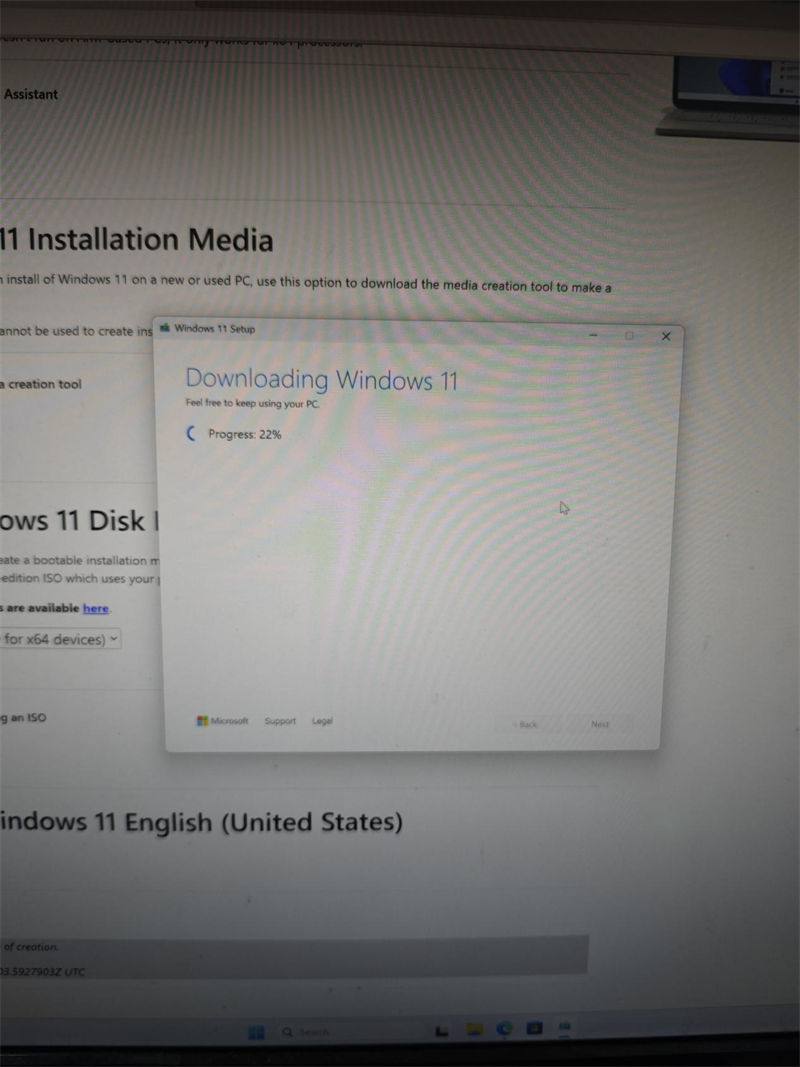
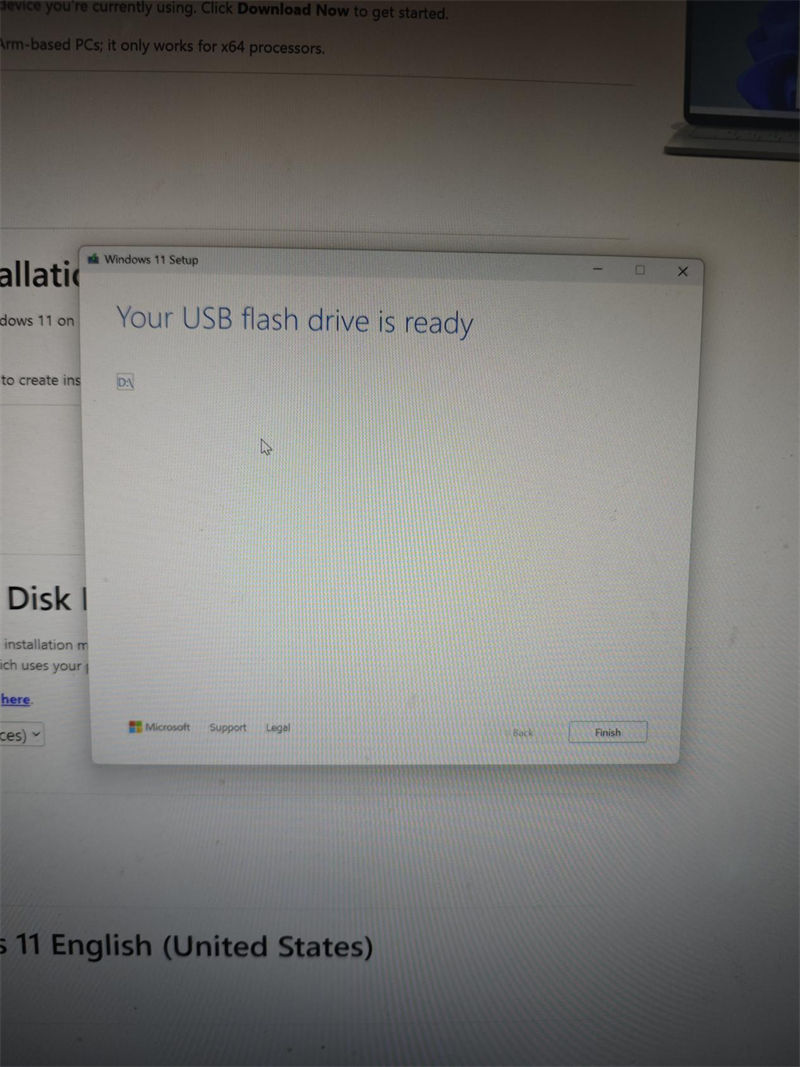
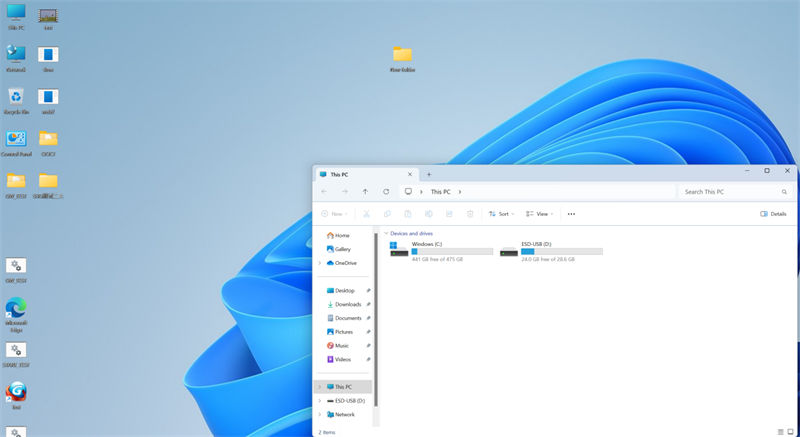
Then select Restart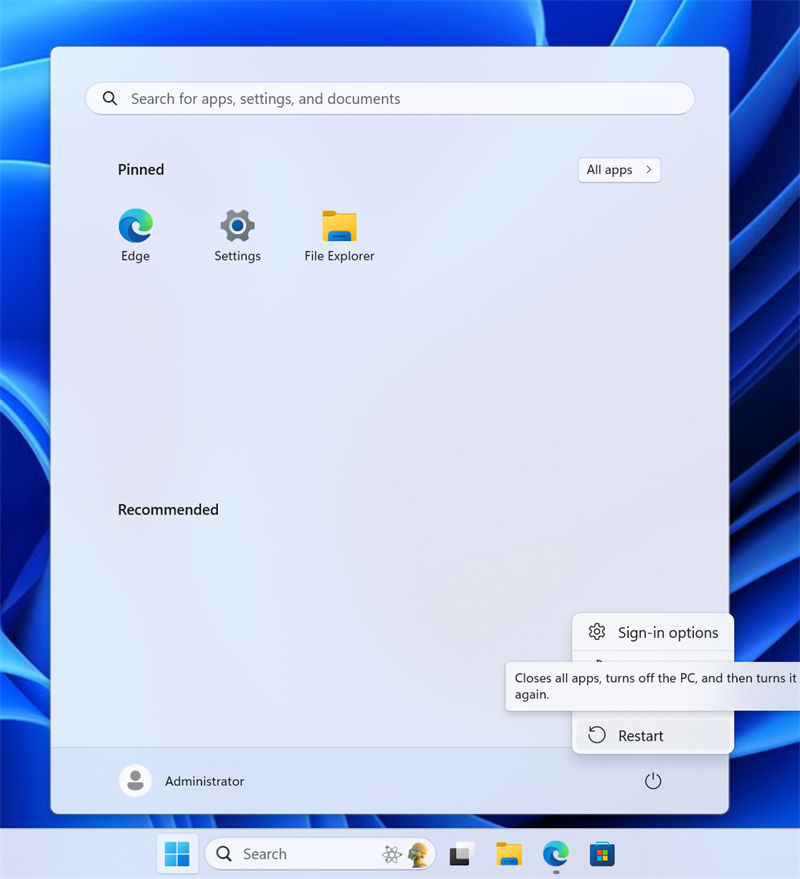
Before re-entering the system, repeatedly press the DEL key to enter the BIOS, and select BOOT as shown in the figure, find BOOT OPTION#1 and select USB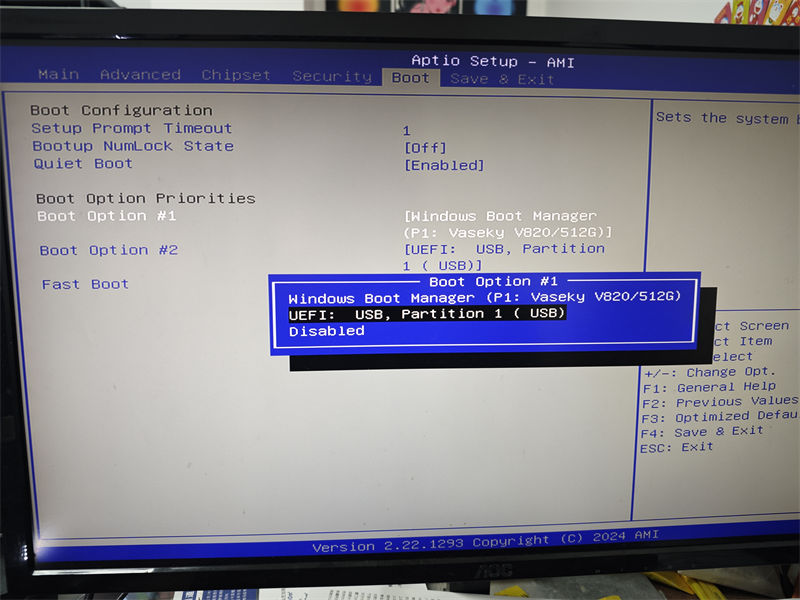
After making your selection, press F4 to save and select the language you want to install again (here we take US as an example)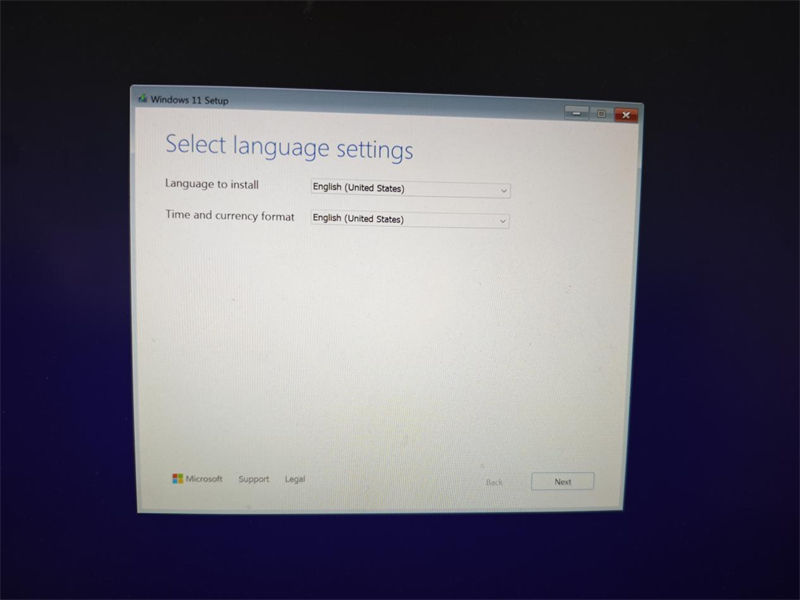
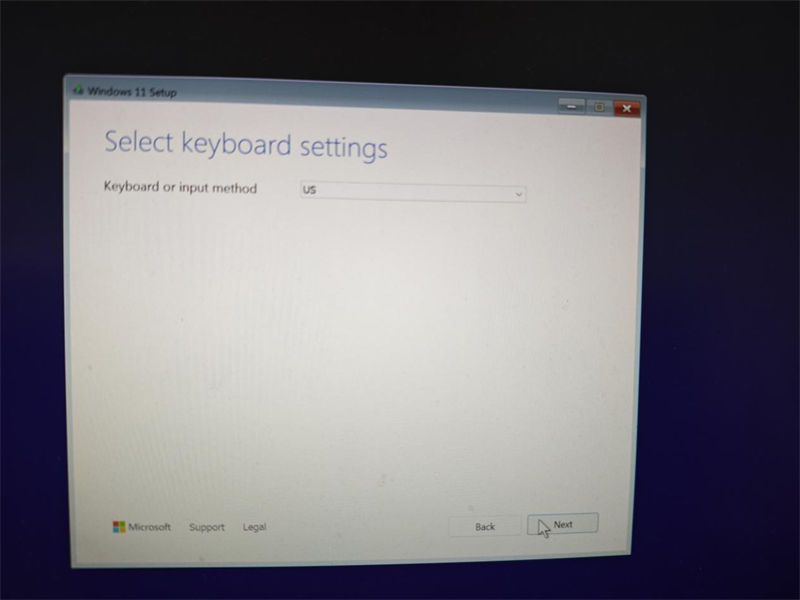
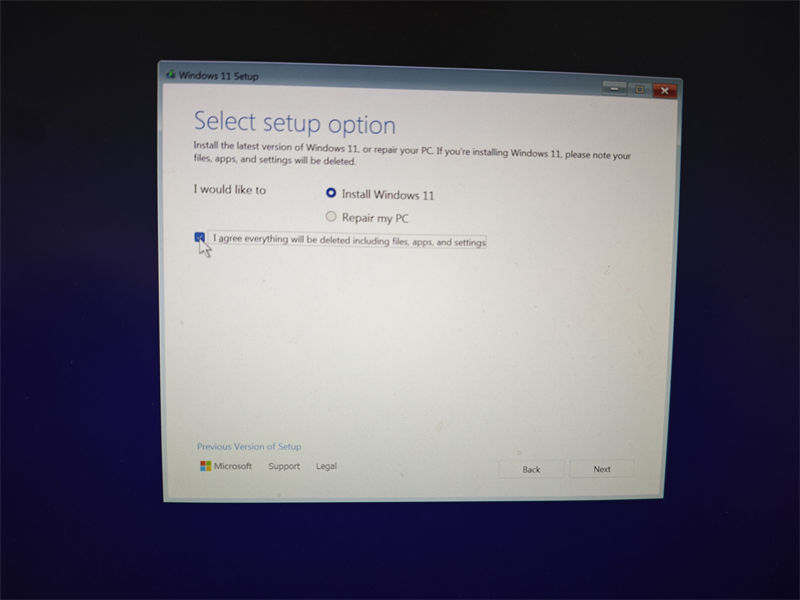
If you need to enter a key here, you can ask us to provide it.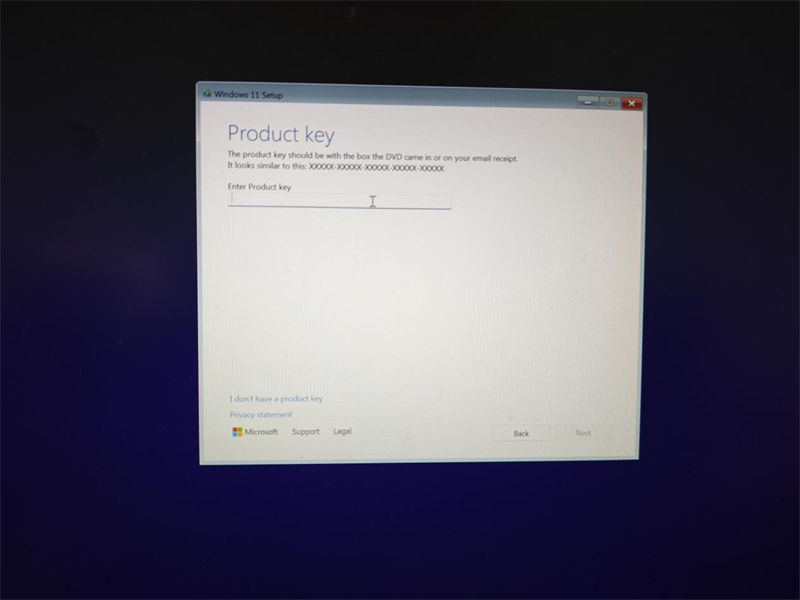
Choose Windows 11 Pro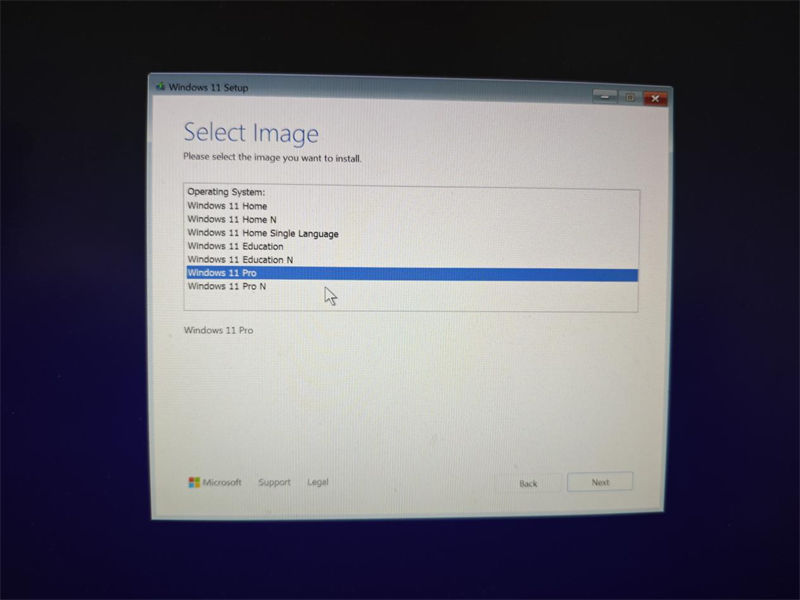
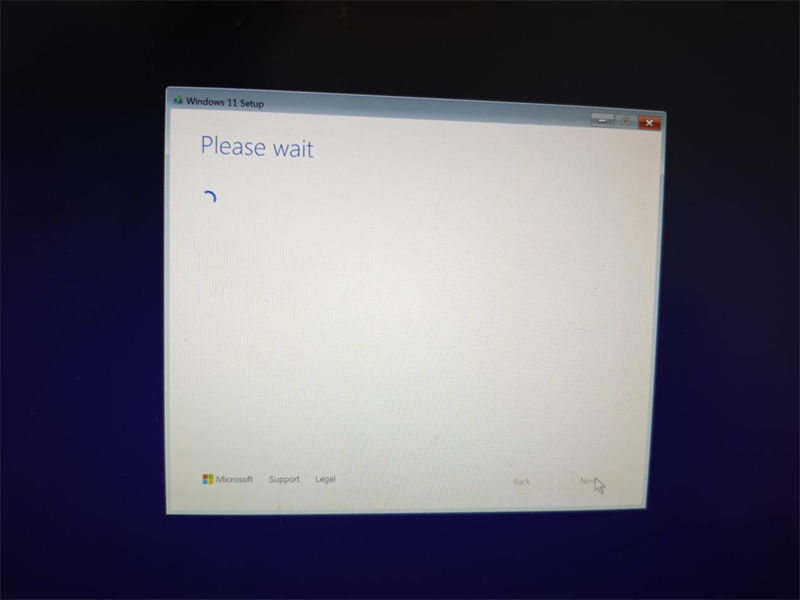
Here you can choose a system disk with larger memory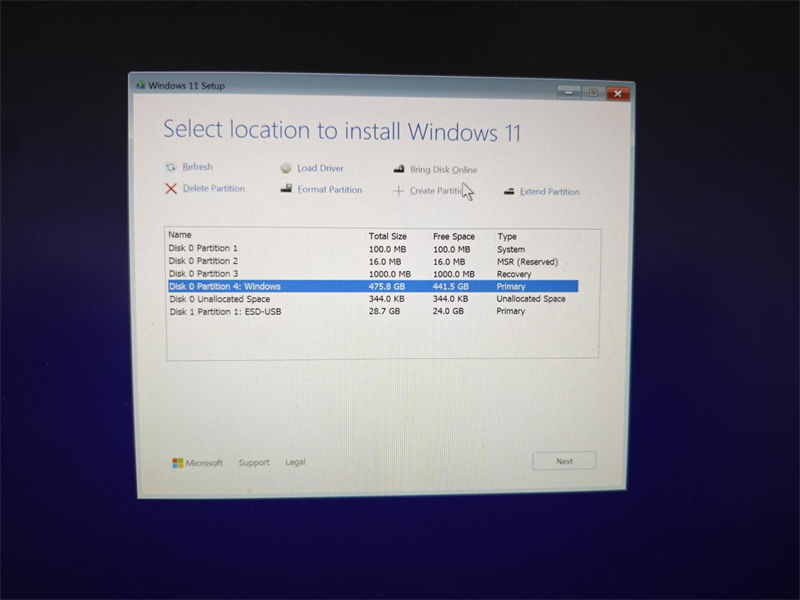
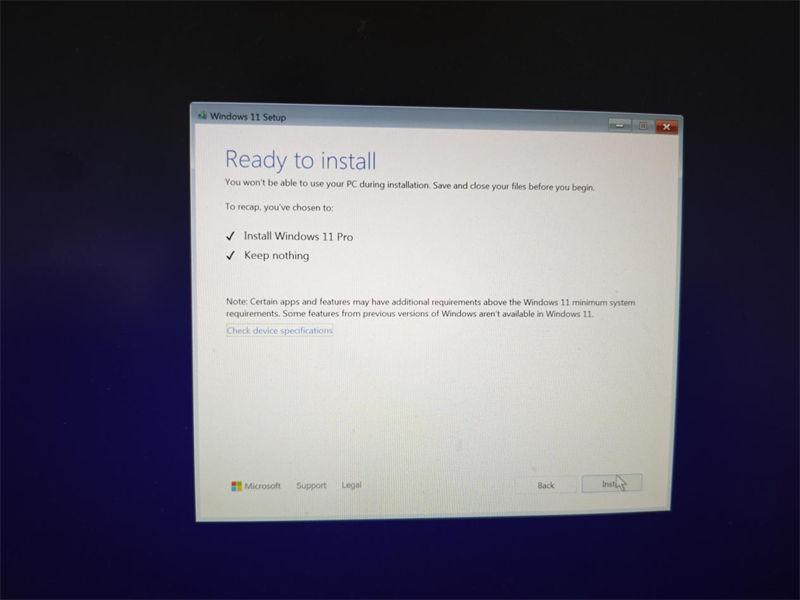
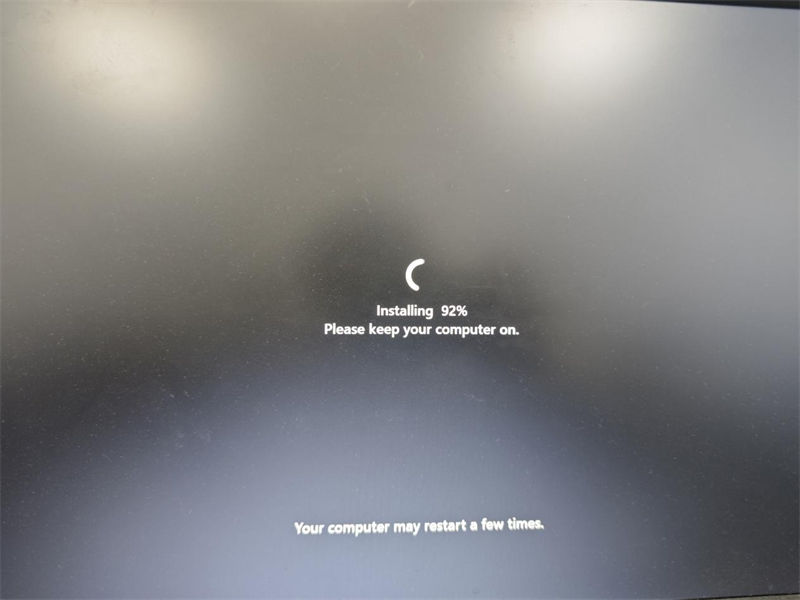
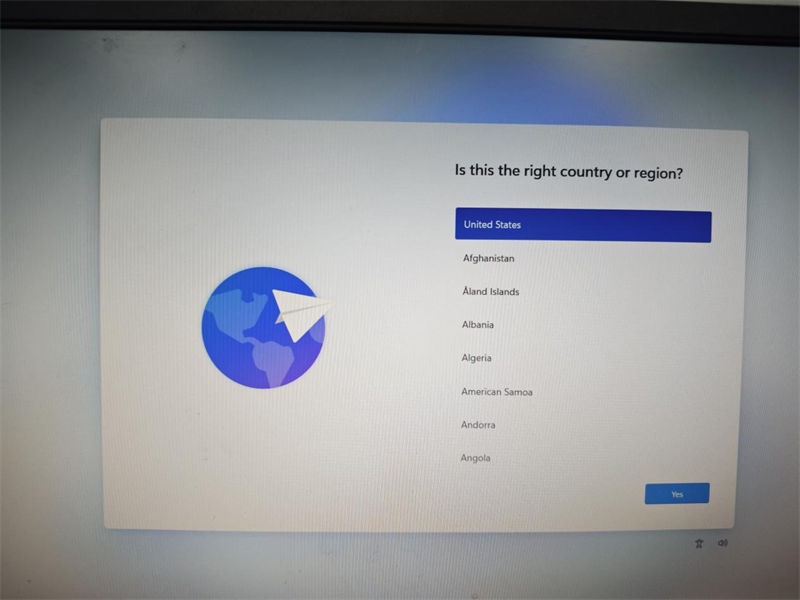
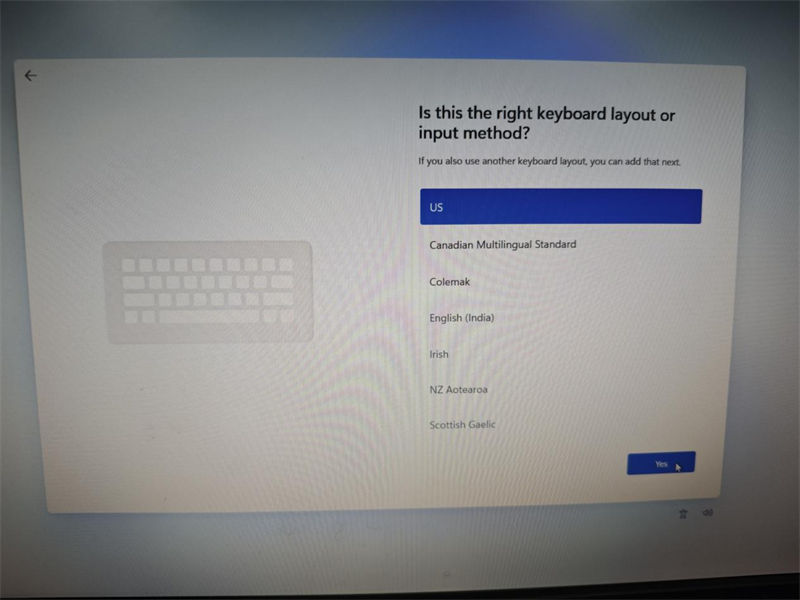
Here you need to download a WiFi driver first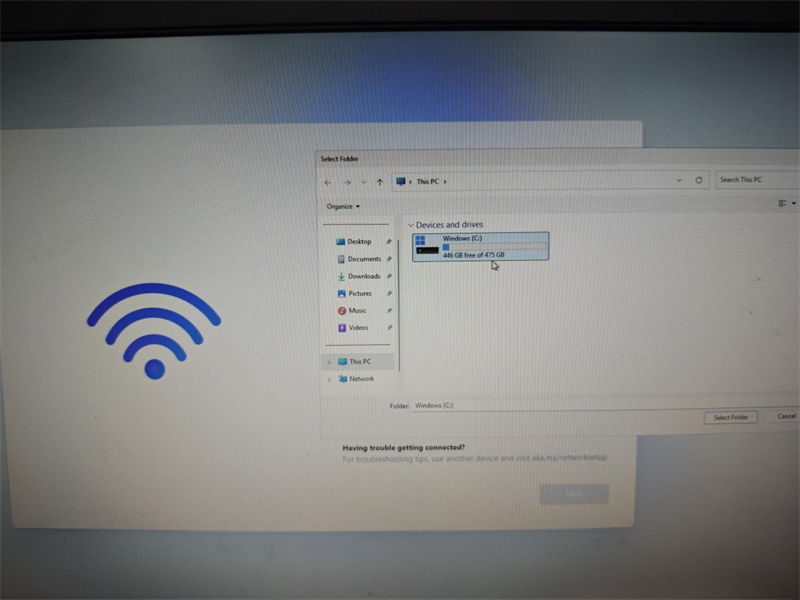
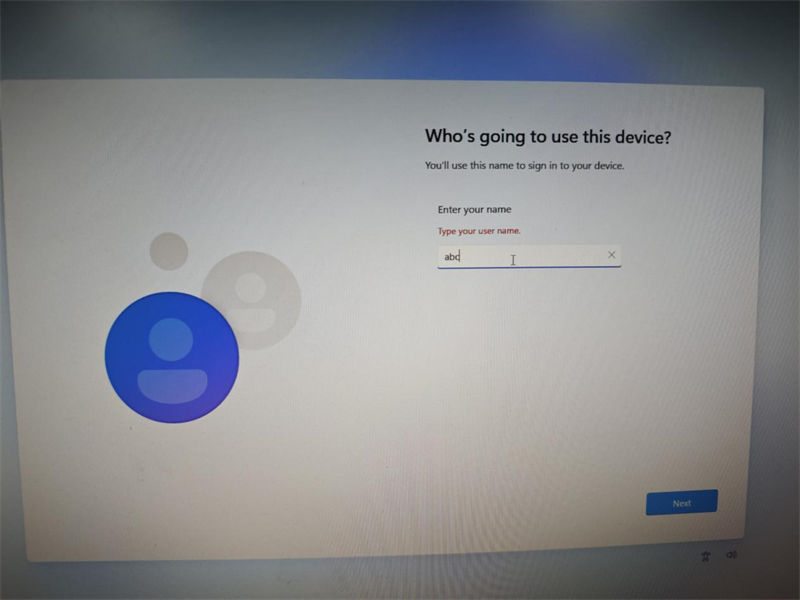
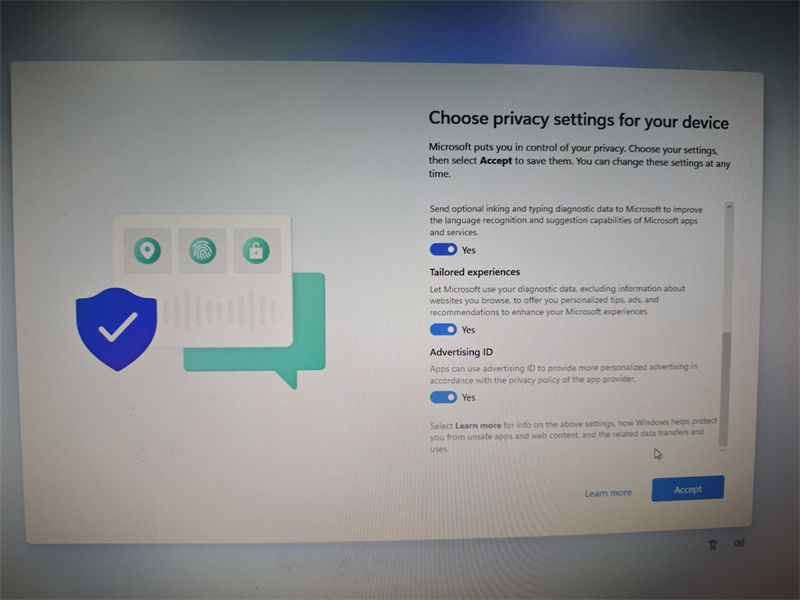
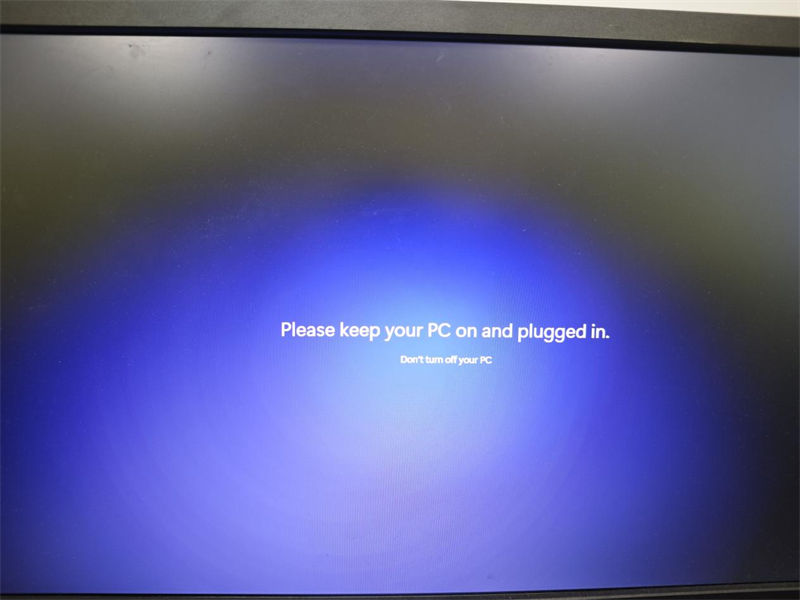
Finally, you can successfully enter the boot page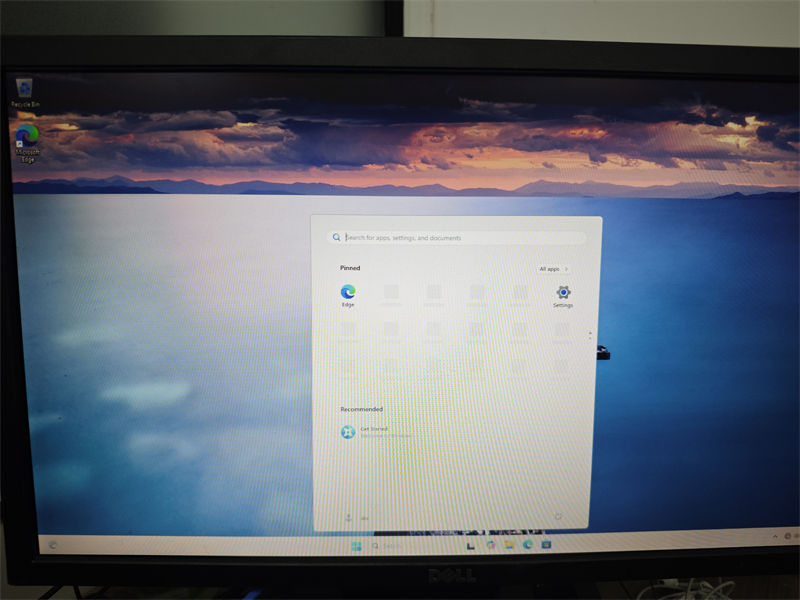
- Q:
I NEED TO ADD A NEW HARD DISK PARTITION AND ALLOCATE CAPACITY
- How to add a new hard disk partition and allocate capacity
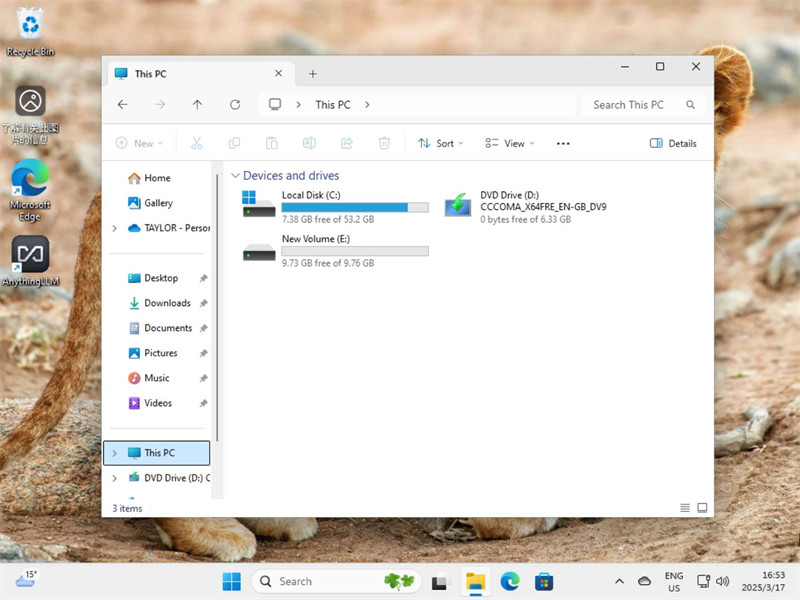
01.Right-click on This PC, select Show more options, then select Manage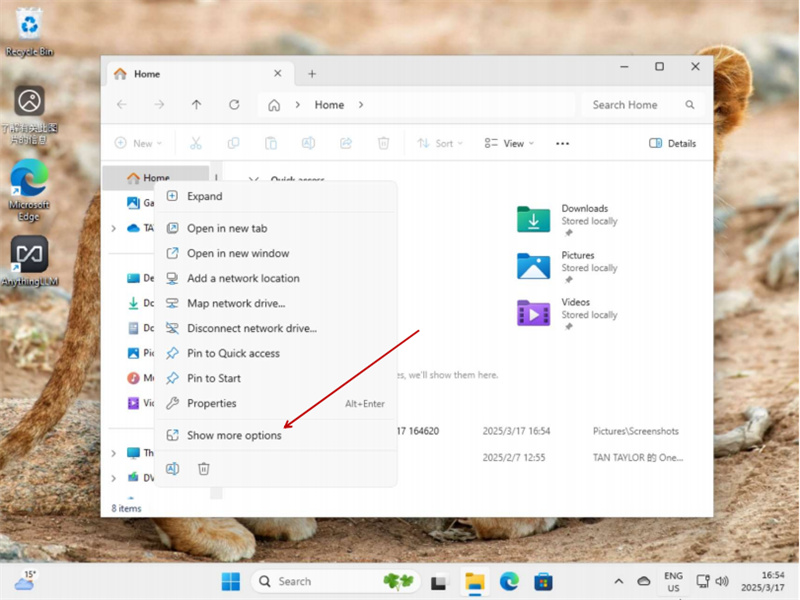
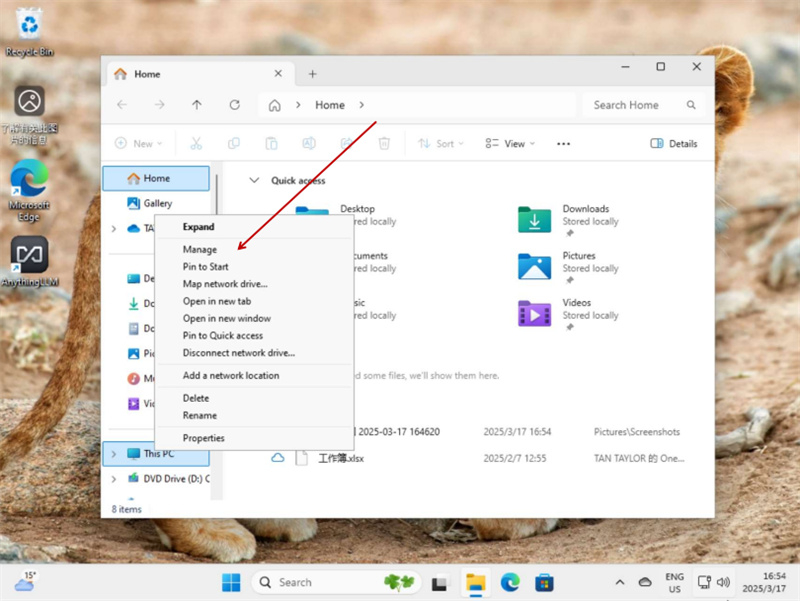
02.Storage---Disk Management---Right-click on Disk 0--- CDrive---Shrink Volume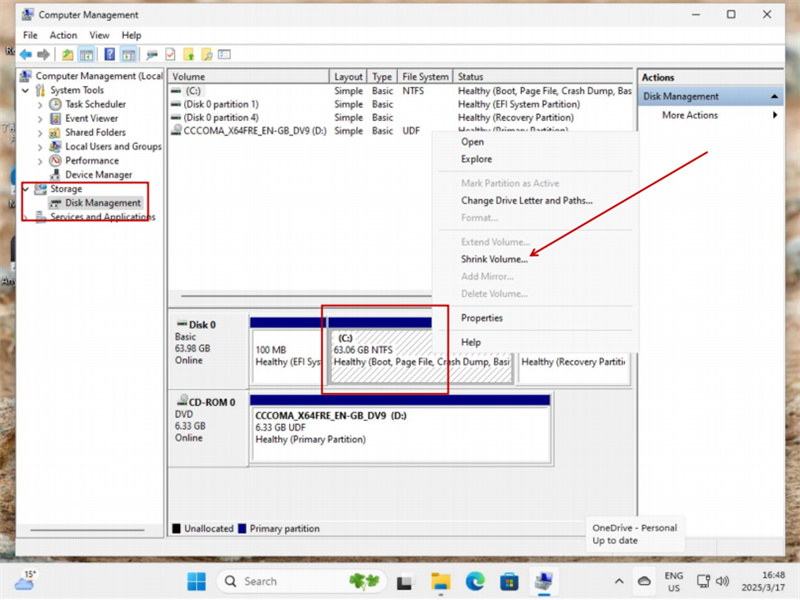
03.Enter the amount of space to shrink in MB:(xxxx---The value within the range of the current remaining space of the C drive,It is recommended to reserve at least 20GB of space for the C drive)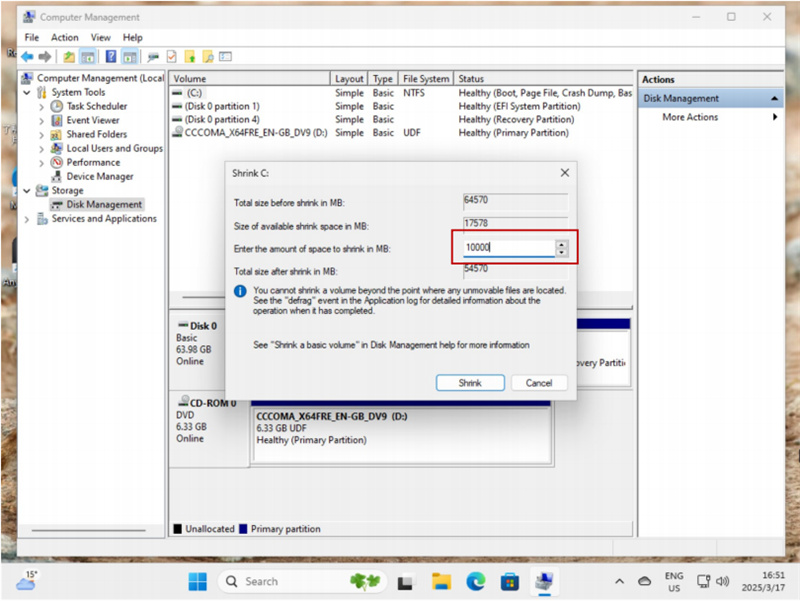
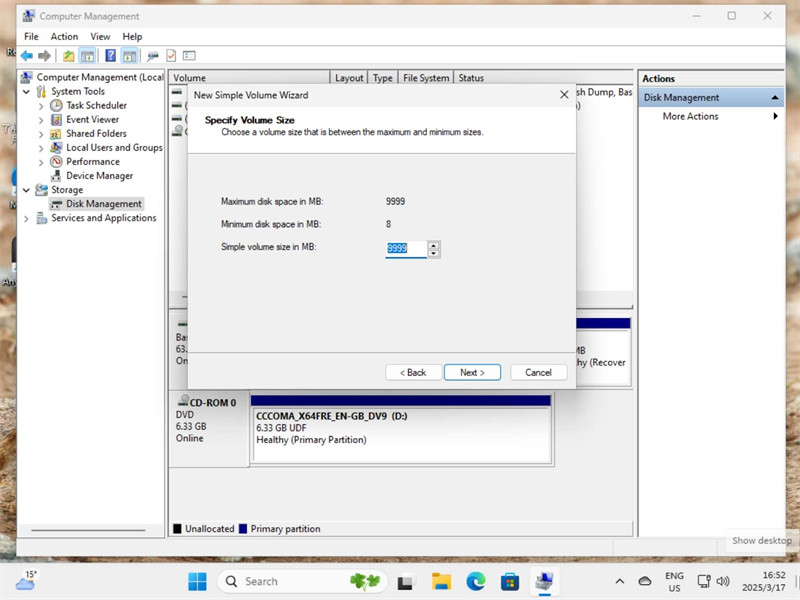
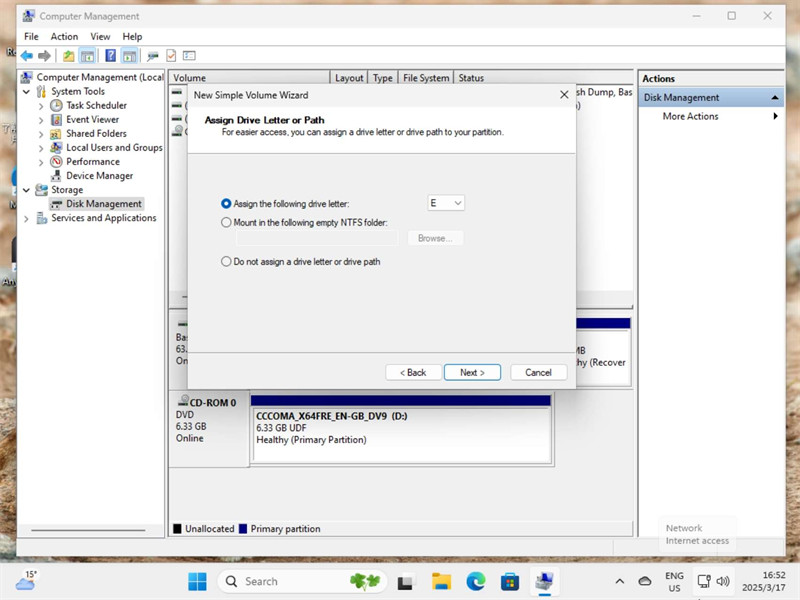
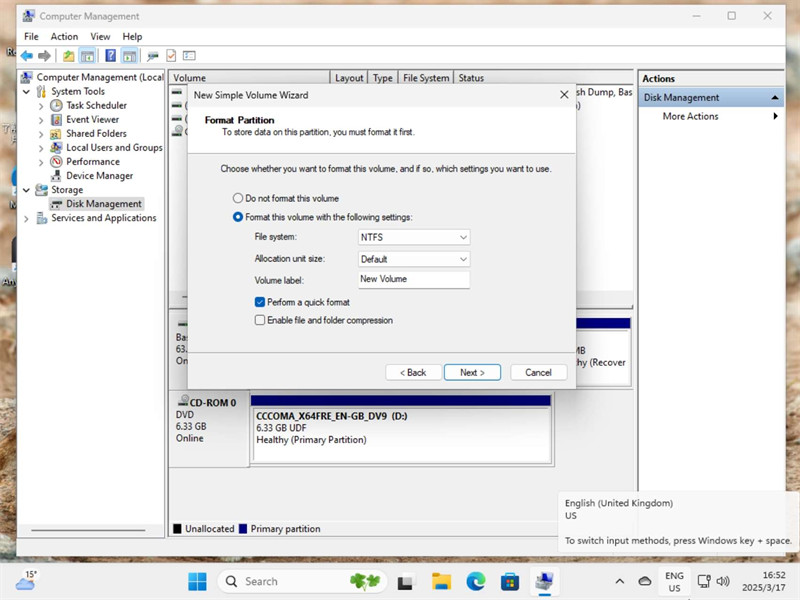
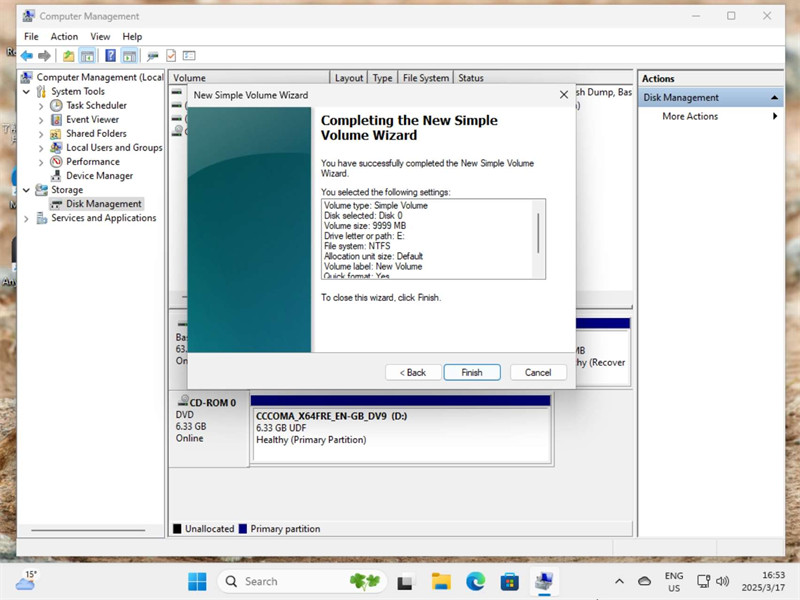
04.Right-click on the newly added hard disk space and select new samplevolume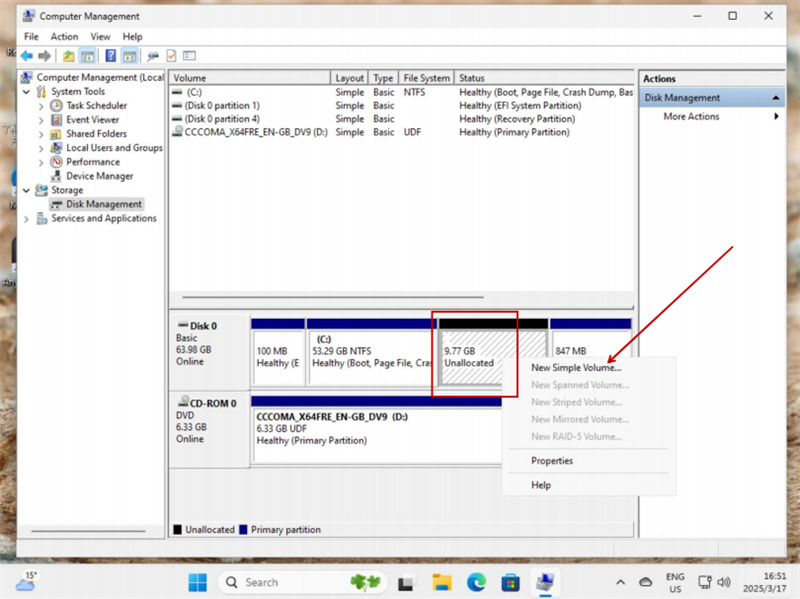
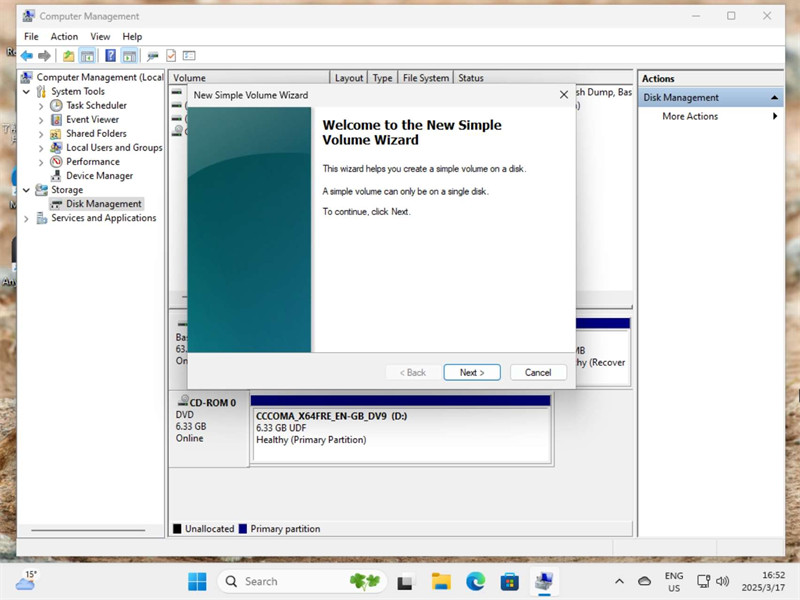
- Q:
MY MONITOR CANNOT DISPLAY WHEN CONNECTING DREAMQUEST PC
- It may be due to poor contact with the RAM stick
1.unscrew the four screws at the bottom of the pc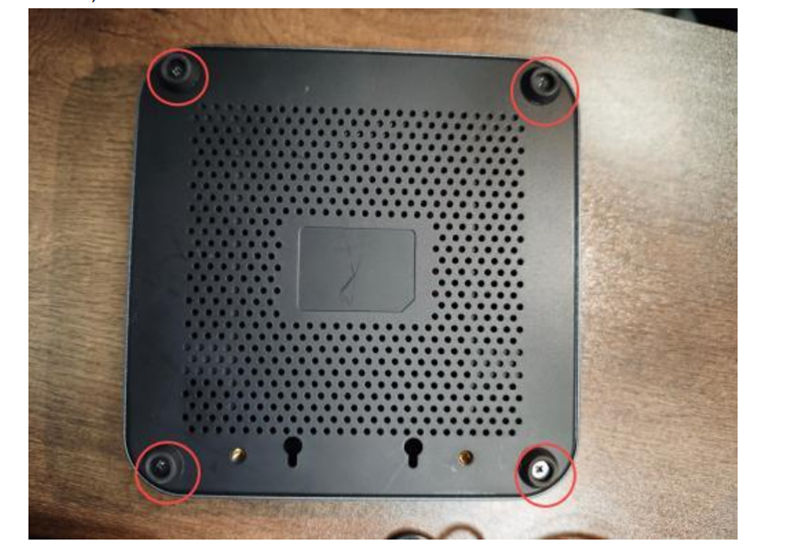
2.Note the screws next to the hard drive, unscrew them and take out the hard drive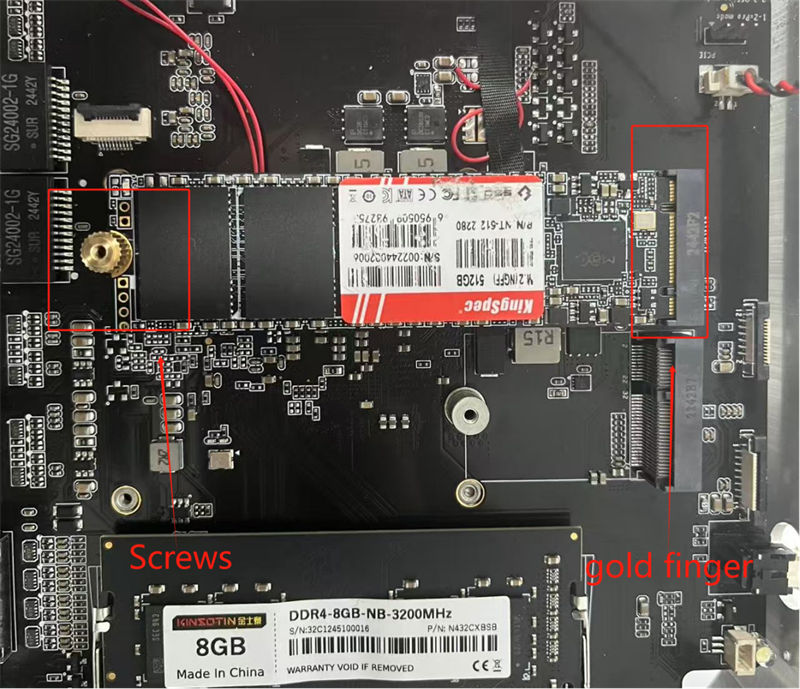
3.Wipe with a soft dry cloth or eraser.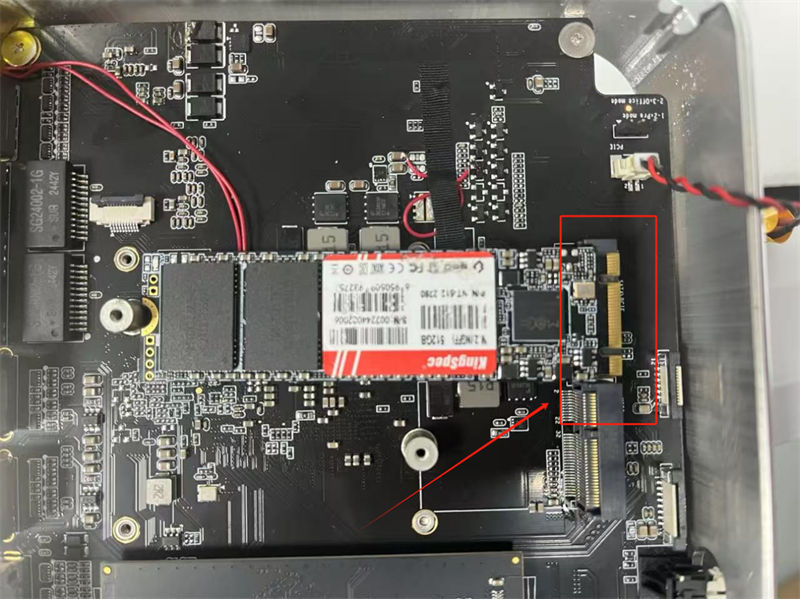
If this does not solve the problem, it is highly likely that the RAM disc is cracked or damaged internally, so please contact our customer service promptly!
- Q:
TROUBLESHOOTING AND SOLUTIONS FOR BLUETOOTH, WIFI OR AUDIO NOT WORKING
- Troubleshoot:Right click ‘Windows icon’, select ‘Device Manager’, if “exclamation mark icon” appears, it shows that the driver is dropped.
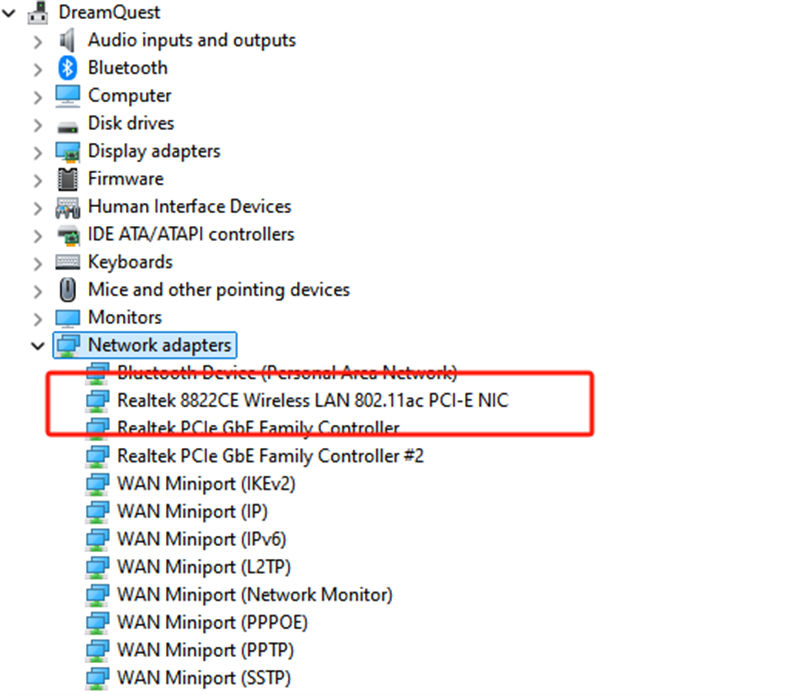
Installation:1.Please visit the official website (https://reachingtech.net/dreamquest-pro-plus-driver-down. load/), go to ‘Technical Support’ → look for the driver of the corresponding model and download this file.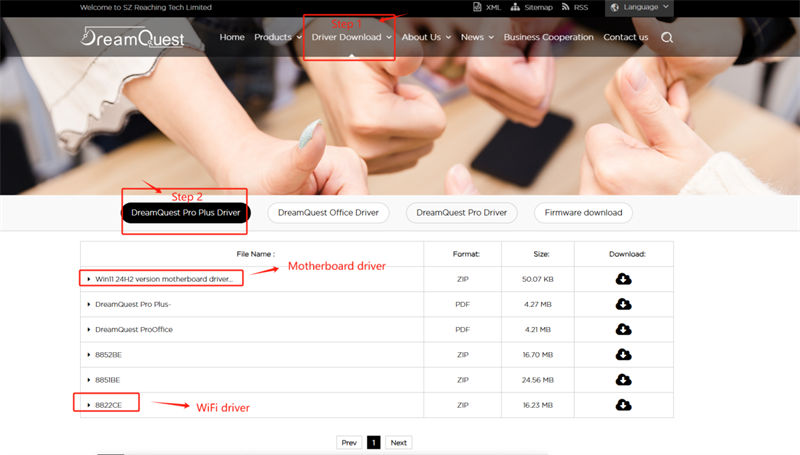
2.Right-click ‘This Computer’ and select ‘Manage’. Select ‘Device Manager’. Right-click the device with the exclamation mark and select ‘Update Driver’.
3.Select ‘Browse my computer for drivers’. Click ‘Browse’ and locate the folder containing the drivers. Select the driver folder and click Next.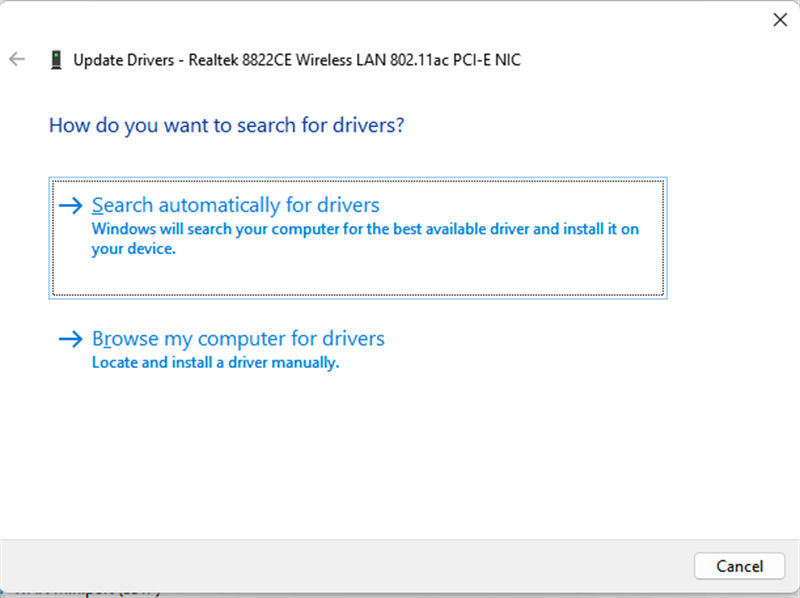
4. Wait for the installation to complete. Restart the computer when prompted after the installation is complete.
- Q:
WHAT SHOULD I DO WHEN COMPUTER AUTOMATIC REBOOT
- After pressing the power button, there is no picture on the screenand the power indicator light is off. If the power indicator light is off, it may be that the adapter cannot supplypower orthe main components are abnormal and cannot be turned on. Check for external devices or any hardware devices that have been installed/changed Sometimes, external devices connected to thecomputer can be the reason for automatic shutdown/restart, so try removing them such as external hard drives, printers, memory cards, dongles, etc. After that, restart your computer.
1.If you don‘t experience problems after restarting your computer, an external device may be the cause of the problem. We recommend that you do not use this device and contact your device manufacturer for support.
2.If you are not using any external devices or the problem persists after removing them, verify if you have installed/replaced any hardware devices such as disk drives (HDD or SSD) or memory modules. Compatibility issues may be the cause and exist between the new hardware device and the product/system, so try removing the hardware device.
3.If you do not experience this issue after removing the hardware device, we recommend that you do not use the device and contact our for support.
4.If the problem persists after the above steps, continue to the next chapter for troubleshooting. Check for recently installed/updated software or applications.Some issues may arise after Windows updates or specific applications installed on your computer, including compatibility issues between applications and the system, or core Windows programs may crash. You can view update history to check recently installed updates.1. Type and search [Windows Update Settings] in the Windowssearch bar and click [Open]2. Select [Update History]3. In the update history, it will list the installed feature updates, quality updates, driver updates, etc. on your computer.
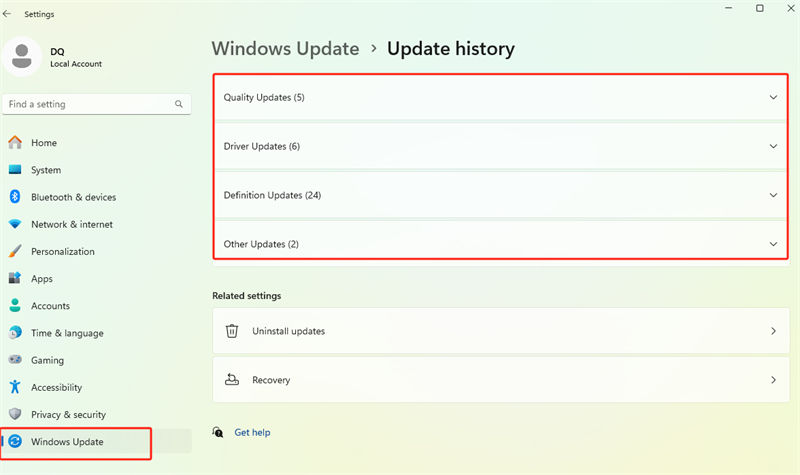
You can confirm the installation date and whether you are experiencing auto-shutdown/restart issues afterwards, then follow the steps below to learn how to uninstall or return to a previous version. Uninstall quality Windows updates Return to previous driver version Uninstall specific applicationsIf there are compatibility issues between the initially installed application and the Windows system, automatic shutdown/restart issues may occur, so we recommend that you uninstall the application first.If the problem persists after uninstalling this application, we recommend that you check the supported operating systems or specifications on the official website of this application or contact the application manufacturer for support.If the problem persists after the above steps, continue to the next chapter for troubleshooting.Perform a Windows System RestoreIf all troubleshooting steps have been completed but the problem persists, back up your personal data and then perform a system.Reinstall Windows system
- Q:
WHY ACTIVATION SYSTEM FAILED
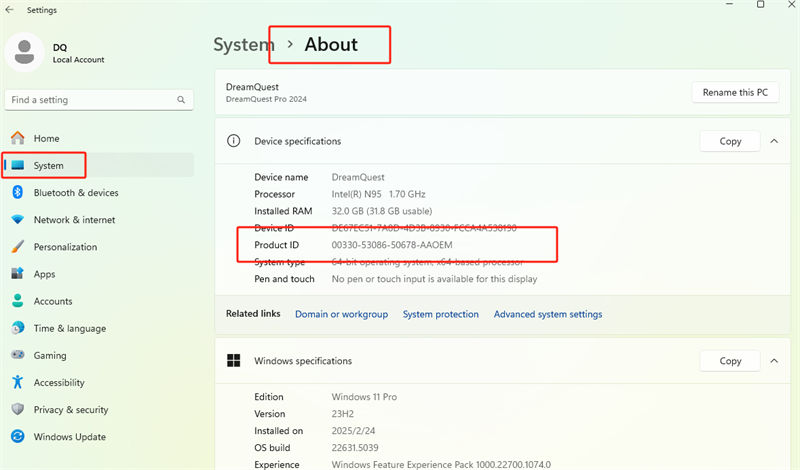
- 1. Activation failed device information- Windows version and product ID:- Go to Settings → System → About → Take a screenshot of the"Windows Specifications" and "Product ID" sections.
2. Activation error screenshot- When the key input fails, please take a screenshot of the full errorprompt window (such as error code 0xC004F050 or similar).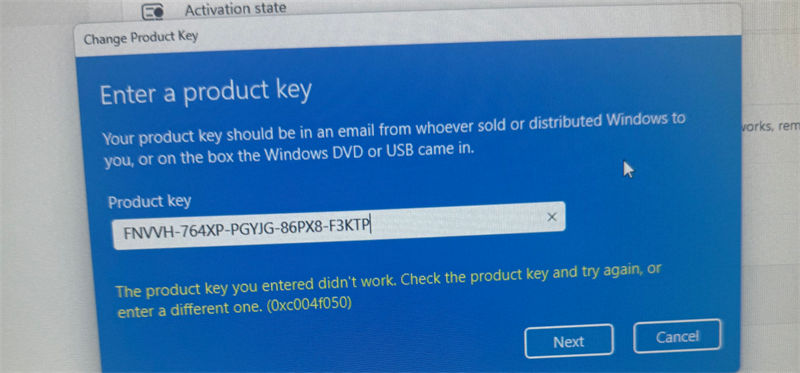
3. Key usage verification- Please confirm that the same key has not been used on both devices.Each key we provide is only for single device activation.(Please contact us for a new key)
- Q:
WHY ARE EXTERNAL DEVICES NOT WORKING (E.G. USB STICK, MONITOR, HEADPHONES, ETC.)
- If the difference between the output or input parameters of the external device and those of the computer is too large, resulting in the external device not being able to be used or not being able to achieve the corresponding effect, you can try to replace the corresponding external device by referring to the parameters of the DreamQuest product.
Interface Configuration:
Type
Details
Descriptions
TF card
External memory
512 GB 1TB 2TB
USB interface
Data transfer supportive
USB3.2(5GB/S)x4
Earphone with Mic
Audio output/input
∮ 3.5mm standard jack
DC connector
Power
∮ 4.0mm power connector
HDMI interface
Audio/Video output
HDMI 2.0, 4K@60Hz, HD* 2
DP interface
DP*1
Type-c interface
Type-C*1
M.2 2280
External memory
M.2 2280 NGFF(SATA) SSD*1&Pcie SSD *1
SATA 3.0
External memory
SSD or HDD 2.5",7mm Max
Necessary Accessories:
Type
Details
Descriptions
Power adapter
Standard Configuration
∮4.0mm DC 12V@3A
Software Configuration:
Type
Details
Descriptions
Operating System
Operating system version
windows 11 Pro, windows 11 Home, Linux
Video Decoder
HEVC (H.265)MP L5.1 8b/10b, up to 4kx2kp60
MP L5 8b/10b, up to 4Kx2Kp30 H.264CBP, MP, HP
L5.2 up to 1080p240, 4kx2kp60VP8 Upto 4kx2kp60JPEG/MJPEG1067 Mpps (420), 800 MppAudio Decoder
MP3/WMA/AAC/WAV/OGG/DDP/HD/FLAC/APE
Temperature
-10℃~50℃
If the problem still exists after replacing the corresponding external device, it is considered that the driver of the product has been dropped or the internal hardware has been damaged, please contact the after-sales service in time.
- Q:
WIFI WORKING TOO WEAK
- First
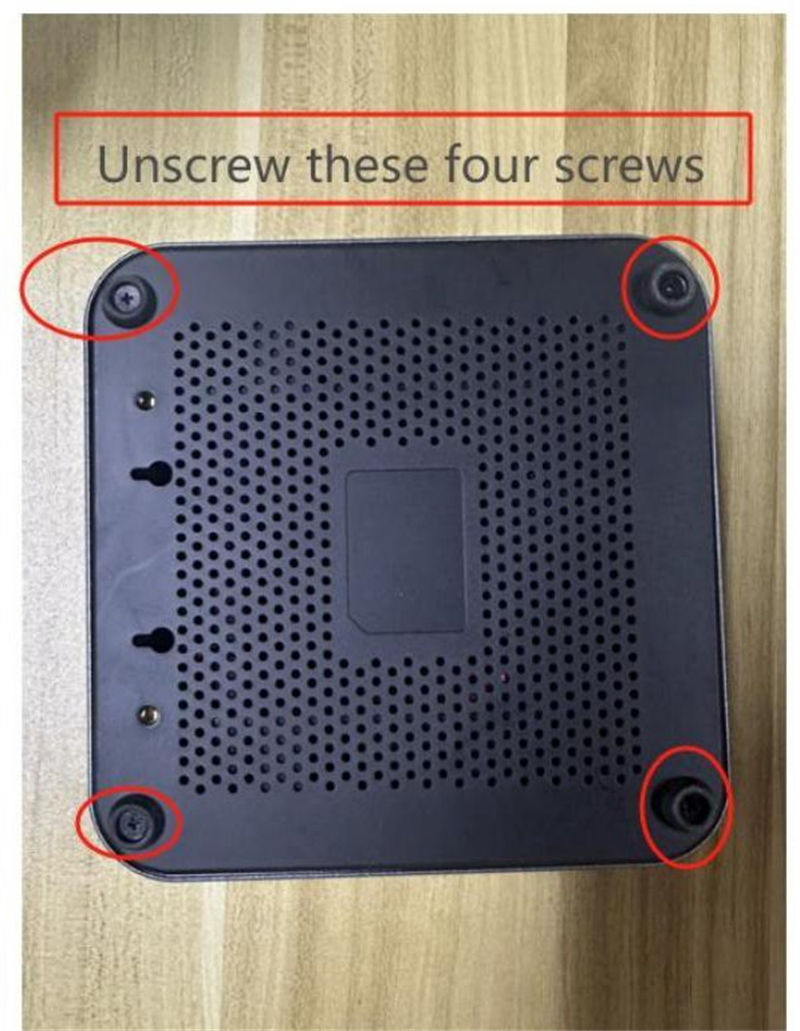
You will see this side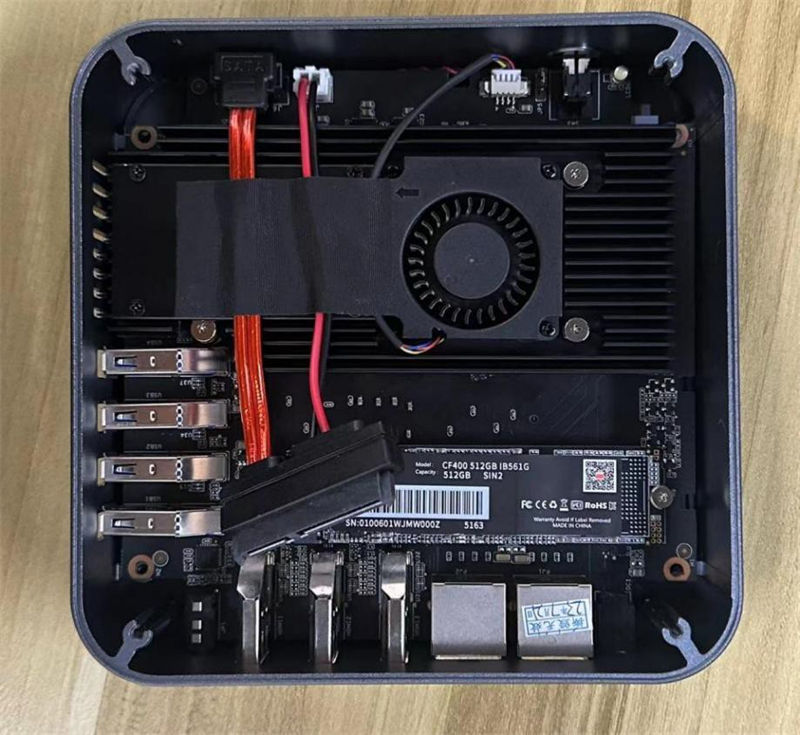
And you need to find the two lines extending from the circled place.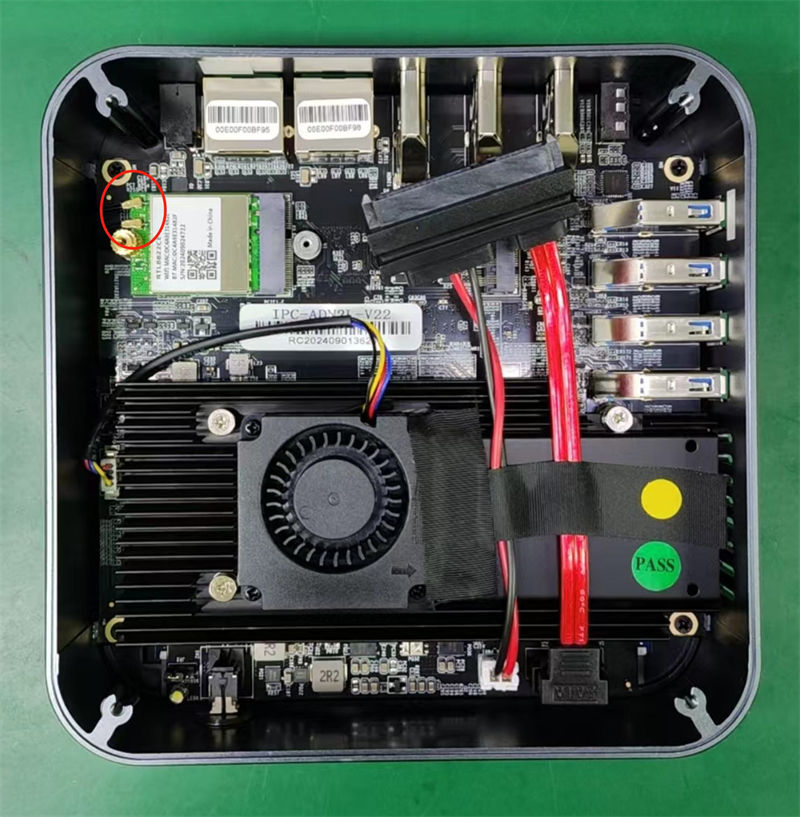
Secure the other end of the wire to the circled position on the housing cover with tape. Make sure the wires do not come into contact with the memory chips.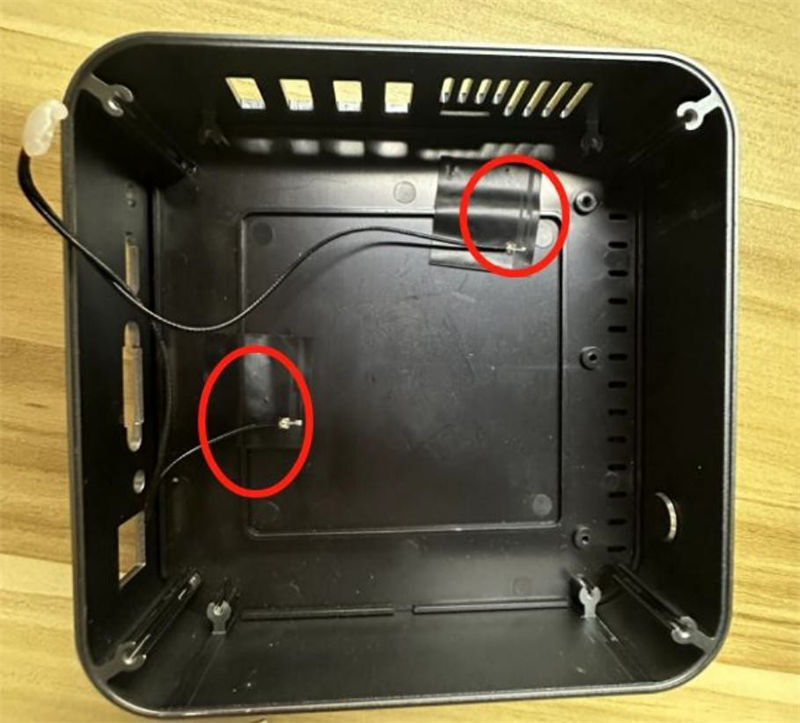
How to restore your computer?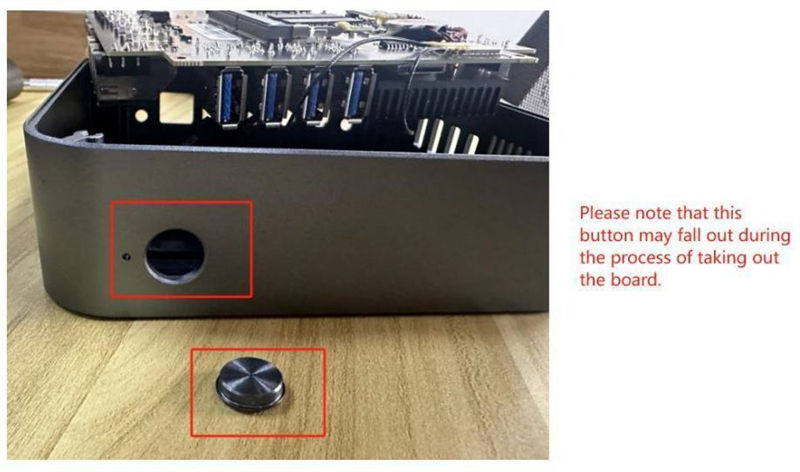
Before install ation, you need to install the button and temporarily secure it with a sticker.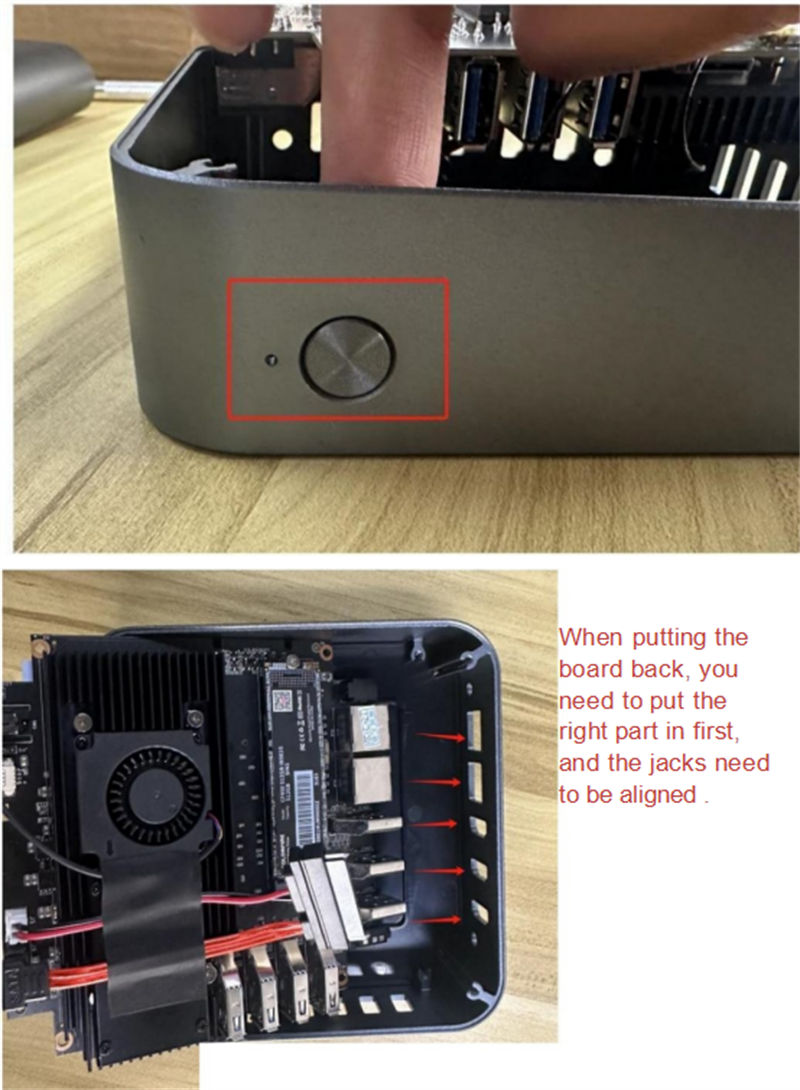
and temporarily secure it with a sticker.

